Creamy mushroom & green bean pork steaks recipe

It’s hard to get kids to eat more mature meals – grown-up dinners that appeal to the adults – so I wasn’t sure how to serve my children some gorgeous pork loin steaks that were making my mouth water. I decided to go for a tried and true recipe I grew up with, pork chops with cream of mushroom soup. Of course, not content to just dump the contents of the tin onto some fried chops, I created this recipe, which went down a treat. Using my cast iron pans makes colouring the meat really easily, but if you don’t have one, just leave the meat alone for several minutes to sear the colour onto it in any deep frying pan. I was really surprised at how keen the kids were once the chops were in bite-sized pieces and swirled into the mash.

You can choose to make your mash anyway that suits, but this recipe offers a microwave shortcut that shaves time and clean up in half. Peeling the skins once the whole potatoes have been cooked is much easier, and you don’t have to worry about a pot adding to the steam in your kitchen in the summer.

I used a teaspoon of bacon fat I had saved in my fridge to fry off the steaks, but a bit of veg oil will do the trick if you don’t have lard on hand. I happened to have it after a bacon-heavy brunch, but I must admit it adds a lovely depth of flavor to the pork and onions. You can keep it basic, or add more of your own flare to this dish, so I hope you’ll find inspiration in this ramped-up old standard that takes less than 30 minutes.

Creamy mushroom & green bean pork steaks recipe

You’ll need:

  • 4–6 pork loin steaks or pork chops (depending on the thickness of the steak)
  • 2–3 tablespoons Worcestershire sauce
  • 1 tablespoon garlic granules/powder
  • 1 teaspoon bacon fat or veg oil
  • 1 cup chopped white onion (I use frozen)
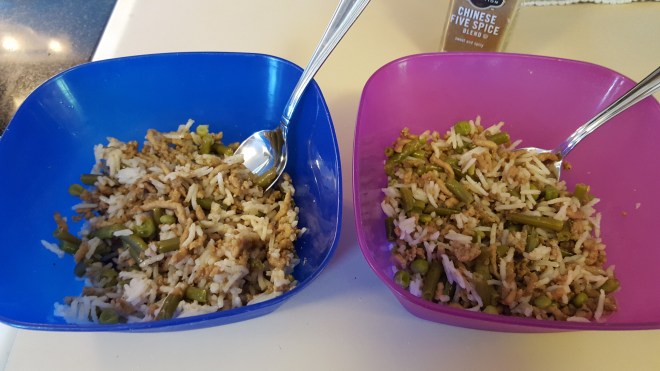
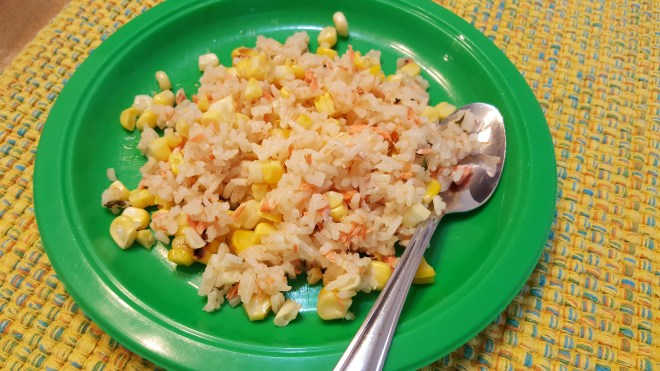
  • 2 cups chopped green beans (again, frozen is so easy)
  • 1 cup water
  • 1 8oz (small) tin cream of mushroom soup
  • 1 tablespoon dried oregano
  • 1 teaspoon dried tarragon (optional)
  • ¼ cup single cream or half & half (optional)
  • 4 large baking potatoes
  • 2 tablespoons salted butter
  • ½–1 cup milk
  • Salt and pepper to taste

The method:

At least one hour prior, but preferably the night before, place your steaks or chops into a plastic bag to marinate in the Worcestershire and garlic.


Pork steaks marinating

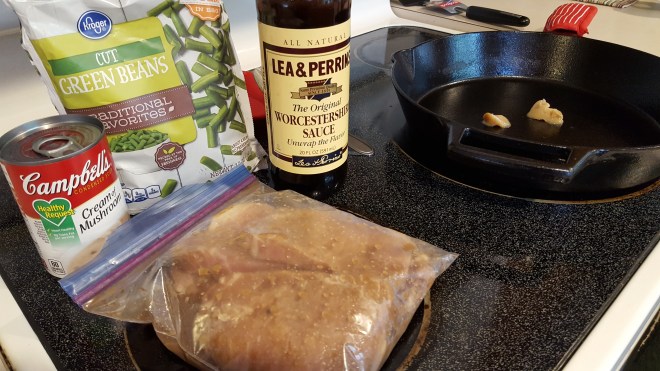
Bring a nice deep frying pan to a medium-high heat with either the lard or oil to fry off the steaks. Try not to move them so you get a lovely, deep colour on both sides.

Pork steaks browning

Add the frozen onions after both sides have some colour, and allow them to create a bit of liquid for clearing the fried bits off of the bottom of the pan.

Pork and onions.jpg

Add the green beans and mix into the onions. You can add up to one cup of water to help if needed.

Stir the liquid created with the dried oregano before adding the tin of soup.

Stack the steaks to one side whilst you incorporate the soup and the onion and green bean sauce.

Add another splash of water if you want a thinner sauce, but it will reduce as you decrease the heat to medium-low.

Allow the sauce to come to a slight bubble over the steaks, for about ten minutes to keep the steaks tender.

While the pork is finishing and the sauce is reducing, scrub a few good-sized potatoes and poke them each in several places before placing on a microwave safe plate.

Microwave on high (or use the “baked potato” setting) for 8–12 minutes, or until they’re all soft to the touch.

Once the potatoes are all cooked through, roll them in your hands with an oven glove to loosen the potato inside. Allow the potato to cool slightly before peeling away the skins by hand.

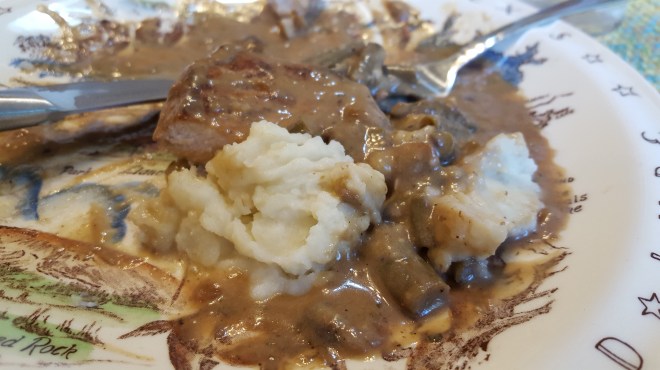
Add the butter and milk, salt and pepper, and mash together with a fork. Reheat if necessary before serving.

As the sauce for the pork reduces, add salt and pepper to taste. Optional additions are a bit of cream and dried tarragon right at the end, which I find add a richness and aromatic quality. I mix them in right before I turn off the heat.

Serve the steaks with the mash, and drench them both in the gorgeous sauce and beans. I promise you won’t be disappointed.
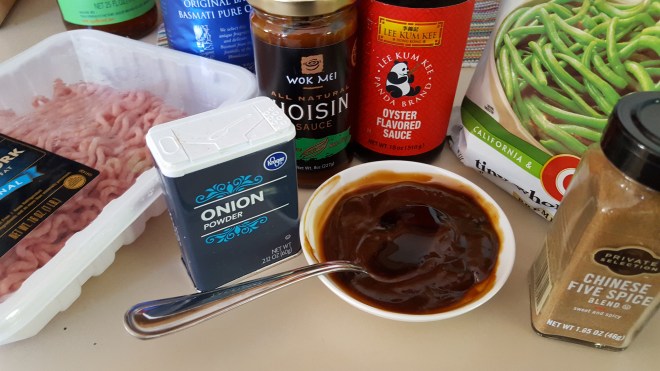
Forkful of pork and mash

Grilled Salmon and Sweet Corn recipe

Summer is upon us, and in full on heatwave mode! The sunshiny days are glorious, but they don’t inspire a love for slaving over an even hotter stove. In protest, I take to the grill and opt to BBQ nearly everything that requires cooking. Fresh ears of half-husked sweet corn are plentiful in the grocery, and I keep my eye open for the sales of fresh fish and grillables. I recently saw a stellar deal on salmon fillets, so decided to grill the fish in a bid to tempt my children. They aren’t the most adventurous eaters, so when my 6yo proclaimed he loves salmon and wants it every night, I figured I had better share the recipe!

summer deals!.jpg

You’ll need:

  • Approximately 2.2kg/1lb fresh, skin-on salmon fillet
  • 2–3 tablespoons lemon juice (fresh is best, but I tend to use the plastic squeezy type for ease)
  • 2 teaspoons fresh pressed garlic (I keep a jar in the fridge)
  • 1 cup fresh chopped coriander
  • 1 teaspoon cumin powder
  • 1+ teaspoon coarse salt
  • 3–4 ears half-husked sweet corn on the cob
  • Optional bag of mixed greens for a quick bed of salad
  • Optional 1 cup of white rice for a bed of rice (I tend to have leftover rice in my fridge, but you can make it while the fish is grilling if you like)

The method:

Using a large sheet of aluminium foil, lay your salmon fillet skin down onto the centre of the foil.

Using a small bowl, combine the lemon, coriander, garlic, cumin and salt before spreading the mixture on top of the salmon.

Salmon ready for the grill.jpg

Loosely cover the fish with the foil and seal the strip with a bit of crimping at the top and sides. Your salmon parcel is ready to marinate for about 15 minutes, while you get the grill ready (you can also use the oven at 200C/400F).

Salmon parcel.jpg

Using another sheet of foil, cover the grill and place the corn cobs husk up so the kernels are against the foil. This helps to steam the corn in the radiant heat and lessens the risk of burning.

Corn ready for the grill.jpg

After the corn has been on the grill for about 10 minutes, add the salmon parcel and reduce the heat to a medium flame/setting. Be sure to place the fish skin down, the top/opening of your foil parcel up and ready to open.

After 10–15 minutes, depending on the thickness of the fillet, you should open the parcel and allow the steam to escape. Check the centre to ensure the fish is fully cooked before removing from the grill. You shouldn’t need to have the fish on the grill for more than 20 minutes total.

If you’ve put the corn on before the fish, these should finish at the same time. Pierce a kernel beneath the husk to be sure it’s cooked through; it should squirt a bit of corn juice at you if it’s finished.

Corn and salmon on the grill.jpg

Clear off the husks once the corn is cooked and cooled slightly. Serve on the cob or sliced off into kernels.

The skin of the salmon may well be stuck to the foil, so if you’re a fan of the skin, I suggest oiling the foil and fish on the skin side when preparing. I love that the skin stays in place while I serve the flesh, but it’s my preference.

With the salmon and corn slightly cooled, you can enjoy these over a salad, with some steamed rice, or with a bit of mashed potato to your tastes. I serve the kids with flaked salmon and sliced corn mixed into rice, but my husband and I prefer to have a big salad. The flavor of the salmon with the coriander is so fresh and earthy, it’s just about my favourite summer treat.  Enjoy!

Kids plate salmon and corn.jpg

Roasted Sweet Potato and Lentil Curry recipe

This a great detox dish if you’re fed up of heavy meals and roasts after Christmas. It’s naturally sweetened by the roasted sweet potatoes, and brightened with lemon or lime juice. My daughter happily scoops up this dinner with her tiny 4-year-old hands, relishing every bite. She even asked for it for lunch, declaring she hates sandwiches and needs lentils and rice. It is a perfect combination for young eaters – easy to eat independently once mummy mixes it together so the rice is coated.

I like the texture and sweetness that oven-baked sweet potato adds to this recipe, and the kids do as well. I’m usually the kind of cook that likes a one-pot meal, but the added baking dish is totally worth it for this. The bonus in the winter is the warmth to be gained from 45 minutes of a high temperature oven. Yes please! This recipe includes carrots, sweet peppers and peas in the rice, so it packs a veggie punch. No meat here, but you could add some tandoori chicken from my previous recipe if you feel like you need it. Lentils provide plenty of protein, though, so we don’t miss the meat. Serving it with a bit of Greek yogurt also adds protein, and creaminess!

I must admit that I don’t measure my spices – I add in dashes – so the measurements in the recipe are approximate. You can use a tandoori spice mix, garam masala or a curry powder that you like instead, but the below spices are those that I find work best with this recipe, so I dash them in. If you prefer, you can add about 1 tablespoon of your mix of choice instead of those below, but I encourage you to try your hand at a bit of dramatic flair and pinch, dash or sprinkle right into the pan.

This is best served with rice; I use jasmine rice because you don’t need to rinse it and it’s a straightforward 1 rice to 2 water ratio. For curry, I like to add frozen peas and a dash of Chinese Five Spice to cook with the rice for the aromatic favour it adds. Whether using a pot or rice cooker, I recommend layering the frozen peas first, then a tab of butter and sprinkle of five spice, then the rice and lastly the water. It saves the rice from burning to the bottom if, for a multitude of mom reasons, you can’t get to it right on time.

Even on its own, this lentil dish is delicious and can be spiced up with chili for braver tastebuds. My kids like it mild, so I don’t have chili here, but feel free to add it to taste.

Sweet potato and lentil curry vertical.jpeg

You’ll need:

  • 1 medium sweet potato
  • 1 tablespoon vegetable oil of choice, high heat tolerant (olive oil isn’t recommended)
  • 1 tablespoon ghee or veg oil
  • 1 medium chopped white onion (about ¾ cup if using frozen)
  • 1 cup/1 medium finely chopped or grated carrot (I use a cheese grater)
  • 1 cup/1 medium finely chopped bell pepper (yellow hides really well)
  • 1 cup rinsed red lentils (or yellow, but please rinse well)
  • ½ teaspoon salt
  • ½ teaspoon cardamom powder
  • ½ teaspoon cinnamon powder
  • ½ teaspoon turmeric powder
  • ½ teaspoon garlic powder
  • ½ teaspoon cumin powder
  • ½ teaspoon paprika powder
  • 1 cup roughly chopped coriander/cilantro (fresh is best, but use less if using those little tubes…)
  • 3+ cups of warm water (additional water to top it up as needed to soften lentils)
  • 3 tablespoons Greek yogurt (optional, but adds creaminess)
  • If serving with rice, I use 2 cups jasmine rice, 4 cups water, 1 cup frozen peas, a tab of butter and a dash of Chinese Five Spice.

The method:

Begin with preheating your oven to 400F/200C for the sweet potatoes.

Peel and chop the potato into roughly the same size pieces for even cooking and add to the tray.

Toss the potatoes in a bit of oil and cover with aluminium foil for the first half of the baking time (20-30 minutes).

In a large skillet, add the ghee or oil, onion and carrots, and lightly brown over a medium-high heat for 2-3 minutes.

Measure and rinse your lentils, ensuring the water runs clear through a sieve. Add the lentils and the peppers to the onions and carrots.

Add your dry spices and coriander to the mixture. You can use a premixed dry curry spice if you prefer.

Give it all a good stir to coat the lentils well with your spices, and allow them to lightly fry for about 2 minutes before adding the water to cover the lentils.

Reduce the heat to med/low, cover your skillet with a lid and allow the curry to soften. You want to be sure the lentils are covered, so you may need to top up the water occasionally. This should only take 20 minutes, but it depends on the lentils.

After 20-30 minutes in the oven, remove the aluminium foil from the sweet potatoes and finish uncovered for an additional 15-20 minutes, or until lightly-browned edges show off the natural caramelisation.

Roasting sweet potatoes.jpg

Once the lentils are just about the desired texture, the sweet potatoes should also be done, approximately 45 minutes all in. Remove the potatoes from the oven and add to the curry. The potato pieces will naturally break apart into the curry as you stir them into the mixture.

At this point, I’ve usually started my rice. There’s a lot going on with this dish, but it simmers away without needing attention, so there’s plenty of time to get the rice going in time for serving. The curry will happily bubble away, reducing to your favourite consistency.

The roasted sweet potato thickens the dish, so you can mix it thoroughly or leave larger bits – it’s up to you! If you like the added creaminess, you can also add the Greek yogurt to mellow the spices and sweetness. If adding yogurt, be sure the temperature is reduced and you just bring the curry back to a light bubble before serving.

We enjoy this with just a bit of rice and a nice big ladle full of lentils. My husband and I usually add a dash of chili flake or a spicy chutney, just for the heat. My daughter especially loves this curry, and doesn’t even need rice. I hope you give this a try and enjoy!
 

Sparkly Mummy


Family dinners aren’t all they’re cracked up to be

Before I had kids, I was adamant that we would always sit down together for family meals. In the typical manner of a person who doesn’t have kids judging actual parents, I thought it was silly to be serving your children a separate meal. I also had this beautiful wholesome image in my head of us all sitting round the table and having a civilised conversation.

But now that I actually have to share my mealtime with my little anklebiters, I understand why some would rather not.

A dramatisation of dinner in our house

Dad: It’s teatime.

There is no response. The TV drones on in the background. 

Mum: It’s teatime! Come sit down at the table, please.

4yo: In a high-pitched tone No! PJ Masks is coming up next! I want to watch PJ Masks!

Mum: We’ll record it then. Presses record button on TIVO with intention of surreptitiously deleting PJ Masks after child is in bed. Turns TV off. Okay, now sit down!

4yo slowly and reluctantly walks towards the table. 2yo continues to play with his Ninky Nonk toy. If you don’t know what a Ninky Nonk is, lucky you.

Mum: Come on! It’s teatime.

2yo: NO! Catch the Nonk!

Mum picks up 2yo who does his best imitation of an angry cat in a bag, noises included. She places him in his highchair and attempts to put on his bib as he morphs from cat-in-bag to enraged Kraken. She passes him his food and he merrily starts eating it.

4yo: wiggling around in chair, not eating. MI, MI, MI-MI-MI. I’m being a Pontipine!

If you don’t know what a Pontipine is, lucky you.

Mum: Please be quiet and just eat your food.

4yo: NO! MI!

Mum: If you don’t eat your food, then you can’t have any pudding.

4yo: BUT I WANT PUDDING! MI MI MI!

Mum shrugs, gives up and attempts to eat her own food while 4yo continues to make irritating noises.

4yo: Need the toilet!

Mum: Well, go then.

4yo: But I need you to watch me.

Mum: …

4yo stands there holding himself and refusing to go to the toilet on his own. Mum gives in and follows him to the toilet and watches while he goes, thoroughly losing appetite in the process. After the deed is done, 4yo returns to his chair and starts happily munching his broccoli. 

Dad (to 4yo): So who did you play with at school today?

4yo: Everyone.

Mum: And what did you eat for lunch?

4yo: I don’t remember.

Mum: What was your favourite part of the day?

4yo: Everything.

CRASH.

2yo: FINISHED!

2yo had finished eating and so he had launched his cup onto the floor. 

Mum: Okay, hun, but you need to wait until the rest of us are finished.

2yo: FINISHED!

2yo picks up his spoon, extends his arm, makes eye contact with Mum, and ever so slowly opens his fingers and lets the spoon fall to the ground. Giggles hysterically. Then, he picks up his plate. Mum grabs it before it ends up on the floor.

2yo: PLAY PLAY PLAY! CATCH THE NONK!

4yo: I CAN’T EAT BECAUSE IT’S TOO NOISY!

4yo suddenly falls off his chair from all the fidgeting. Screams at the top of his lungs.

2yo: PLAY! PLAAAAYYY! AHHHHH!

Dual screaming continues.

Dad quickly serves the children some cake.

Silence. Mum and Dad drink wine.

2yo: dropping cake bowl on floor FINISHED!

Are family dinners civilised in your house? Do your kids respond to your efforts at conversation? Do they always need to take a poo halfway through? Let me know in the comments.

Petite Pudding
Tammymum
Keep Calm and Carry On Linking Sunday
The Pramshed

One-pot tuna pasta recipe

I’m all about the quick, 20-minute meal to feed the hungry crowd, and this version of classic tuna pasta is dead easy. I really like the sweetness added by frying off a few onions in butter before adding the tuna. Usually, tinned tuna is simply stirred into the dish, but I fry it a bit with the onions as I break up the meat, and it just adds a depth of flavour without being labour intensive.

You can use gluten-free pasta if you prefer – any shape will do – but I like standard macaroni for this dish. I know it’s tempting to use a tin of condensed cream of mushroom or chicken soup, but I promise this is just as easy and less gloppy. I only want one pot to clean, so I boil the pasta and peas together, make the sauce while they drain, and then toss it all together again. Easy peasy.

tuna-pasta-in-the-bowl

You’ll need:

  • 2 cups dry pasta
  • 1 cup frozen peas
  • 4-6 cups water

For the sauce:

  • 1 cup chopped white onion (I use frozen)
  • 2 TB butter
  • 1 tin of tuna
  • 1 tsp dried garlic
  • ½ tsp dried oregano
  • 1 cup single cream or half and half
  • 1 cup shredded cheese of choice (I use mild cheddar for the kids)
  • Salt and pepper to taste
  • Optional splash of milk to loosen the sauce as preferred

The Method:

Bring a pot of water to the boil and add your pasta. Adjust the quantities for a larger pot, but this should easily feed a family of four to five people.

After half the cooking time for your pasta, add the frozen peas and bring back to the boil.

Once the pasta is tender, drain the pasta and peas and allow to rest while you use the pot.

pasta-and-peas

Add butter and onions over a med-high heat and allow the onions to go translucent.

Add the tinned tuna and break it up, coating it with the butter and onions, and allow the mixture to fry slightly.

Add the dried garlic and oregano, and mix well before pouring in the cream. Stir well, continuing to break up the tuna and allowing the cream to warm.

Add the cheese a bit at a time, stirring well into the creamy tuna in about three batches. Feel free to add more cheese than stated if you love it!

tuna-pasta-sauce-with-cheese

Allow the sauce to begin to bubble slightly before returning the pasta and peas. Mix well and give it a taste to add salt and pepper as you see fit.

This couldn’t be faster for a midweek meal; most ingredients are staples! Hope you enjoy this no-fuss version of a classic tuna pasta. If you just can’t live without the cheesy-baked top, go ahead and throw it into a baking dish and cover with shredded cheese. I didn’t have the time to oven bake, and this was on the table in 20 minutes! It left me time to play some Uno with the kids.

Sparkly Mummy

Warming Beef Stroganoff Stew recipe

This is a recipe that I love to make if I’m craving soft, tender beef and a warm bowl of dinner. I like one pot, one utensil meals. Am I lazy? You bet.

My family are homebodies. I love an afternoon indoors with the children playing and a pot of stew stewing. I found some lovely beef steaks the other day on sale in my local grocery. I had thought of surprising my husband with a grilled steak dinner, but a rain and wind storm threw that plan right out of the window. Instead, I decided to stew up the beef with potatoes, carrots, peas and mushrooms. It’s the kind of stew that can be done midweek; if you only have an hour before dinner and can manage fifteen minutes to get it started, you’ll easily be able to walk away from it until you plate up.

If you’re not a fan of soured cream or crème fraiche to stroganoff the stew, you’ll still have a hearty, flavourful soup, but I think the creaminess and light tang accompany the potatoes perfectly. Traditionally, you’ll find pasta in a stroganoff recipe, but this is my one-pot, gluten-free, family-friendly version.

Warming beef stroganoff stew recipe

You’ll need:

  • 1-1.5lb beef steak (approximately two medium-sized steaks) cubed
  • 1 tsp veg or olive oil
  • 1 tsp garlic granules or fresh crushed garlic
  • 1 tsp dried oregano
  • 1 tsp dried thyme
  • 1 tsp beef stock concentrate
  • 1 cup chopped onion (I use frozen)
  • 1 cup chopped/julienned carrot (approximately one medium carrot)
  • 1 cup chopped mushrooms of choice (I finely chop so they disappear and the kids don’t know)
  • 1 cup petit peas (I use frozen)
  • 15-20 baby potatoes (small Maris Pipers)
  • 4 cups of water
  • ½ cup (or more to taste) soured cream or crème fraiche
  • Salt and pepper to taste

The method:

Using a nice deep pot over a medium-high heat, add the cubed beef, oil and dry spices. Coat the beef with the spices with a quick toss in the pot, and then allow the beef to brown deeply on at least two sides. If the bottom of the pot starts to stick a bit, don’t worry, that’s flavour that will come up with the water.

Once the beef is browned, but not cooked through, add the beef stock concentrate and a splash of water to dissolve. I do this right in the pot and add just enough water to allow me to loosen the concentrate.

Add the onion, carrots and mushroom to the beef and stock mixture and allow the onions to just go translucent; you don’t want the beef to cook completely.

Add the potatoes and peas, then cover with water.  Bring the water to the boil and then reduce the heat to medium-low, just enough to maintain a simmer. You can walk away from this for up to 45 minutes, checking occasionally to be sure it’s not sticking to the bottom or needs a top-up of water. I don’t bother peeling my potatoes, and only halve the largest, so I like to give this a while to bubble. If you are pressed for time, you can peel and cube the potatoes and halve the cooking time, but be careful they don’t turn to mash.

Slightly less close up of stew.jpg

Once the potatoes are soft and the broth has reduced by about half, add the soured cream/crème fraiche and turn off the heat. I probably use a little more than ½ cup, but my family all love soured cream on potatoes. The beef is so tender by now, it won’t even need a knife. I’ve shown the kids plate version and my warmer bowl of succulent stroganoff stew to tempt you. This is a simple recipe that absolutely oozes flavor, give it a go!

Sparkly Mummy

Shredded coriander (cilantro) chicken recipe

I grew up in California, and I’m pretty sure my first solid food was refried beans. My grandma used to joke that my mother’s first meal outside of the home was at their local Mexican restaurant – a mom & pop kind of place. The owner scooped up my infant mom and sat down with my grandparents, ordered her husband to fetch some refried beans and soft tortilla, and let my mom suck the beans off rolled tortilla while they ate. Home-cooked Southern food is in my Texas-born grandfather’s recipes, and Latin food is a staple I’ve grown up with.

This recipe has been adapted for family life, like so many of mine. I desperately try to balance home-cooked goodness for my family and the desire to let someone else cook. As an essentially lazy cook, I’ve ditched the whole chicken version my family used in days gone by. I go for boneless, skinless breasts and thighs … let the butcher do it! I have made this with a whole chicken, when I was away from home and wanted it ‘just like mom’s’, but I spent so much time scooping out bones and yuck that I got a facial. Using the prepared meat allows you to walk away for ages and never steam your glasses.

You can easily and quickly make this recipe with just one breast (of chicken) if you’re only cooking for two, but I tend to go all out so I have plenty of leftovers. I use this in burritos, nachos, salads, sandwiches – it’s incredibly versatile. If you make a large batch, you can freeze a fair bit for an even easier midweek solution. For this recipe, I gave the kids burritos with a little cheese and soft flour tortillas, I had a taco salad with the meat, cheese and salsa as dressing, and my husband opted for corn tacos. Everyone is happy! Hope you enjoy this as much as we do!

You’ll need:

  • 2 boneless, skinless chicken breasts
  • 2-4 boneless, skinless chicken thighs
  • 1 tsp vegetable oil
  • 1 cup chopped onion (I use frozen)
  • 1 cup chopped red/yellow peppers (I use frozen bell pepper mix with green if tight on time)
  • 1 medium carrot, shredded (about ½ cup if you’re using pre-shredded/julienne)
  • 1 large bunch/2 cups chopped fresh coriander/cilantro (4+ cubes if you’re using frozen)
  • 1 TB minced garlic
  • 1 tsp ground cumin
  • 1 tsp smoked paprika
  • 1 tsp dried oregano
  • ½ tsp chili powder for heat (optional)
  • 1 tsp salt
  • ½ tsp ground black pepper

For serving:

  • Tortillas, taco shells, salad, bread rolls or corn chips – your choice.
  • Shredded cheese to serve with the above as you see fit. I like Red Leicester or Double Gloucester for creaminess.

The method:

I despise chopping onions, so I’m a big fan of frozen chopped onion I can keep on hand. I’ve also found the onion and three pepper blend from the frozen section really useful for this recipe in particular, but if I can’t find it in the shop, I start with chopping the onion, a red pepper and a yellow pepper. The same goes for the carrot … I’m super lazy and buy pre-shredded, but if you’re cool doing it yourself, I recommend the cheese grater for one medium carrot.

Use a nice, big, deep pot for this one, and start with the oil, onion, peppers and garlic over a medium-high heat.

Toss in the dry spices and mix well. Add the chicken pieces and coat with the mixture before allowing it to sit for a minute and add colour.

You’ll only want to cook the chicken for a minute or two on each side, not nearly cooking through, for colour/flavour only. Once the chicken has a little golden brown on a couple of sides, add the shredded carrot and completely cover the chicken with water. The chicken will boil now until it shreds completely, as the water reduces.

While the water comes to a boil, rinse and roughly chop the cilantro/coriander, including the stalks. The more the better, in my opinion, so feel free to add up to 3 cups if you’ve used a lot of chicken. I prefer to take the time with fresh coriander here, because frozen just doesn’t have the same punch.

Add the chopped coriander to the boiling water and reduce the heat to maintain a simmer.Shredded coriander chicken for burritos & more - great Mexican cuising

This is where you can walk away for ages. Occasionally give the mixture a stir to check the chicken is still mostly covered with water. After 30-45 minutes, the chicken should break apart if pressed against the side of the pot with a wooden spoon. Every once in a while, over the course of the next 30 minutes, use your spoon to encourage the chicken into smaller pieces.

If you’re rushed for time, or just keen to help, keep the temperature a bit higher to keep a rolling boil and use two spoons to break up the chicken. If you’re happy to let the water do the work, you can keep a mild boil ‘stirring’ the meat for you for about an hour. Just be sure to check it’s not sticking on the bottom once in a while.

As the water reduces, step in and break up the meat to expose it all to the sauce before it’s gone completely. I usually find a fork isn’t necessary – just good stabbing, twisting and mashing with the wooden spoon (great for letting off a bit of aggression in a legitimate way).

Once the chicken is nicely broken up, allow the remaining water to boil away, stirring frequently at the end to avoid burring. 

The result is an easy filler for lots of different dishes. Straight from the pot, I load up a flour tortilla with a bit of shredded cheese for my kids and roll it up. They’ve been smelling it and can’t wait!

bitten-burrito

Sparkly Mummy

What to do with those roast dinner leftovers?

I love soup, especially in autumn, and I’m always so excited to have steamy bowls of slurpy goodness. My kids, not as keen, and certainly not as clean, on soup. My go-to solution since they were tiny is to serve soup over rice, like in my albondigas recipe.

Add a little, add a lot – it depends on the consistency and flavor your kid enjoys most. If the soup is liquidy, a couple of teaspoon of cooked rice soaks it up. If it’s a cheesy or creamy soup, just a small amount will add texture and thicken, allowing young diners to use their own spoon. We love encouraging our little ones to feed themselves, freeing our hands for food of our own.

This little tip comes in handy for all sorts. I’ve been known to make an enormous roast dinner with too many leftovers (haven’t we all?).

Warming autumn dishes using whatever ingredients you have in

The method:

  • Cube up some gammon/chicken/beef (or forget the meat!)
  • Warm it in a small shallow pan with a splash of water
  • Take some leftover cauliflower cheese, put it in a deep bowl, add some milk and warm it covered in the microwave for a minute or two
  • Give it a good smash up and it basically becomes soup.
  • You can add a bit more milk if you want to loosen it.
  • Once it’s nice and warm, and considerably smashed, add a little rice, the meat, and any spare veg you have from the roast

It’s a bit like bubble and squeak, but with rice instead of potatoes. Enjoy!

Sparkly Mummy

Potatoes ‘Bravas’ with chicken recipe

My husband is Portuguese South-African, and I’ve grown to love paprika in an unusual way. Chorizo is something special; if you’ve never tried cooking with this sausage, I encourage you to try this recipe and discover the joy. I try to find a good quality, hard chorizo, simply because most ‘cooking’ chorizo is incredibly fatty. If you can’t find any, don’t worry, the recipe calls for it optionally for depth of flavour.

potatoes-bravas-pinterest

This is a take on the Spanish patatas bravas: crispy cubed potatoes heavily spiced and fried. I try to keep midweek meals to one pot, and this is a good one if you add chicken strips/chunks to the pan. My kids are big fans of sweetcorn, so I always keep a tin on hand. With this dish, it adds a crunchy sweet freshness that curbs some of the spice. I usually drain the corn, but keep it room temperature and sprinkle on like a sort of veggie crouton.

If I don’t have a lot of time to stand at the stove, this is also a fabulous tray bake for about 40 minutes in a 180C/375F oven. I try not to use too much oil and salt, but you can use your judgement and taste buds for this quick, flavourful meal. It usually only takes twenty minutes to cook, if the potatoes are in small cubes, and it’s something I fall back on if I’m short on ingredients. Most are staples I have on hand, and it takes very little prep.

chopping potatoesYou’ll need:

  • 1 or 2 white potatoes, peeled and cubed
  • 1/3 cup chopped red or white onion
  • 1/3 cup roughly cubed chorizo sausage (optional)
  • 2 tsp veg oil of choice
  • 1 or 2 chicken breasts sliced into strips
  • 1 tsp garlic granules
  • ½ tsp paprika
  • ½ tsp cumin
  • ½ tsp oregano
  • 1 tsp salt (to taste)
  • 2 TB chopped tomato
  • Approximately 1 cup sweet corn

The method:

If you’re lucky enough to have found a lovely chorizo, start with slicing and quartering about a 1/3 of a cup and add it to the warming pan. I use a cast iron pan, but you can also use a wide-based pan that’s good for browning.  I keep the temperature around a medium-high while the chorizo warms and begins to run paprika juices – it smells amazing!

Add the onion and potato to the oil produced and stir until they are coated with the colourful paprika oil from the chorizo. Then add the veg oil and dry spices, coating the potatoes evenly before leaving them to brown.

spices and potatoes in the frying pan

If you aren’t using chorizo, add the oil, potatoes and onions all together with the dry spices and give it a good mix before leaving to fry over a medium high heat.

Stir infrequently to allow colour to form on all sides of the potatoes. If the spices begin to stick to the bottom, rather than adding more oil, try adding a splash of water from the kettle and gently scraping the bottom of the pan with a spatula. This will also help soften the potatoes in the steam produced.

While the potatoes are softening, I slice up the chicken into small, even strips that will cook quickly. If you’re going for the tray bake, try to keep the chicken pieces a little larger so you can put everything in at the same time and they won’t be overdone.

Add the chicken to the potatoes before your next scheduled stir, and toss everything together to coat the chicken with the contents of the pot. Again, refrain from too much stirring so you’re sure to get good colour on most sides of the potato cubes and chicken.

raw chicken added to potatoes
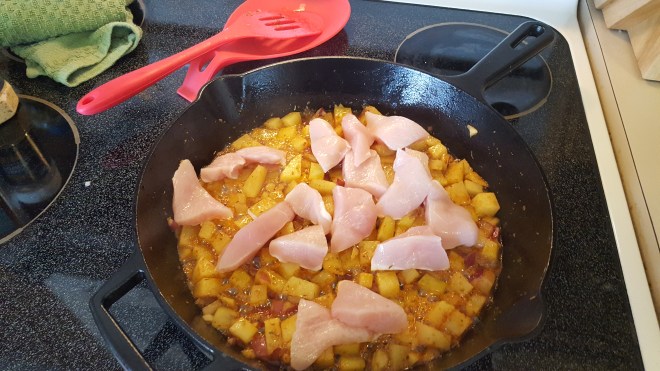
Add the chopped tomato and give it another good mix-in. The chicken should be cooked after 10-15 minutes, and the tomato adds a bit of tenderising acidity.

You should be able to break a piece of chicken apart easily with your spoon, and the same again with a potato cube, after 20-25 minutes.  Drain your sweet corn, or slice from a fresh cob if it’s the right season.

Potatoes bravas in the pan

Plate up with a sprinkle of corn over the bravas, and enjoy! My kids don’t even ask for ketchup with this, because the tomato and spices in the dish keep it moist. The chicken stays tender and flavourful for the quick cooking, and I’m in and out of the kitchen in no time.  If I’m really pressed for time, I toss everything together into an oven tray and check on it for a stir every 15 minutes until it’s done. Either way, it’s a winner, winner chicken dinner in my house!

dinner-plates-with-food

Sparkly Mummy

Chinese take-away pork & green beans recipe

We’re all so temped by take-away food – the ease, convenience and speed, and the taste! Over the years, I’ve lived with people from a lot of different cultural backgrounds. East Asians, Pakistani, Greek, Italian and English tastes have now fused with my own and had a major impact on my cooking.

Anyone that’s been following this recipe blog will remember the Tandoori Chicken and Dahl recipe I shared, fine-tuned with tips from a Pakistani friend of mine. The dish I’m sharing in this post was learned from my wonderful Chinese housemate – and like most of mine, it’s one that you can make your own in no time. The recipe I’m sharing here is one variation, and it can easily incorporate more or different veg, Quorn or ground turkey.

This is a super-fast, kid-friendly meal that’s also gluten free. It can be vegetarian if you prefer to stir-fry tofu or Quorn. My hubby always goes for seconds on this one, and there’s just so much less oil, MSG and other restaurant add-ins. Trust me: try this and you won’t even miss the local Chinese.

You’ll need:

  • 1lb ground pork
  • 1 tsp sesame oil
  • 1-2 tsp Chinese five spice (or your own with clove, anise and black pepper at least)
  • 2 cups topped and tailed green beans (fresh is quicker, but frozen is fine)
  • 1-2 tablespoons Oyster sauce
  • 1-2 tablespoons Hoisin sauce (we use gluten free)
  • 1 tsp rice wine vinegar
  • 1 tsp or one cube concentrated chicken stock
  • 1 tsp onion powder
  • Optional sweet chilli sauce (for grown-ups and adventurous kids)
  • 1-2 cups white rice (gauge your family’s love of rice)
  • Chicken or veg stock in the rice (optional)
  • 1 tsp of Chinese five spice in the rice (optional)
  • 1 cup frozen peas in the rice (optional)

Chinese stir fry ingredients

The method:

If you’re lucky enough to own a rice cooker, by all means use it, and well done you. I am a sad sap and have no such luxury, so with this recipe I get the rice started first, in a pot, on the stove. I add a bit of chicken (or veg) stock, a dash of Chinese Five Spice and some frozen peas to the water, bring it to the boil and add the rice. Some rice cookers are cool with spices and stock, but if you’re not sure, maybe just make plain white rice, and the stir fry will still be amazing.

Mix the Oyster and Hoisin sauce with the five spice and onion powder and set aside.

If you’re using frozen green beans (they’re already topped/tailed/halved!), I recommend starting with the beans in the wok with the sesame oil. Toss the beans around to lightly coat with the oil, and then turn the heat to high. If the beans are fresh, add them after the meat has begun to brown.

Rice and stir fry on the stove
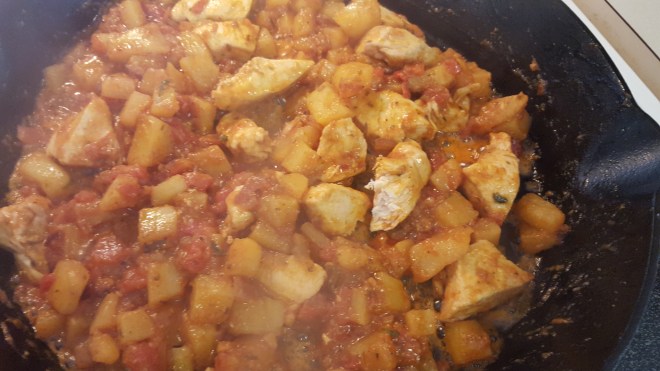
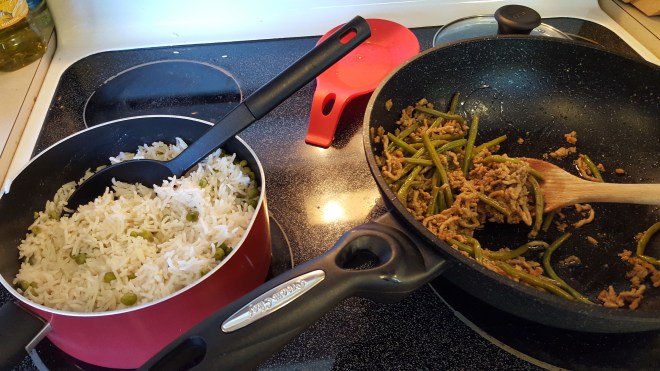
On a high heat, keep the beans from sitting in one spot for too long while they thaw a bit. Once they’ve started to soften, they should only take 2-3 minutes.

Add the ground pork and break it up in the wok. Be sure the sesame oil is in the wok if you’ve not added the beans yet.

Add your pre-mixed sauces and spices (Oyster, Hoisin, five spice and onion powder). Mix it into the meat as you’re breaking up the mince. The benefit of pre-mixing the sauces and dry spice is these can all be added in one swift motion, allowing you to continue stirring and breaking up the meat.

Once the mince is broken into nice small bits and all coated with the sauce, stop stirring for about a minute or two (phew!) to allow some colour to brown onto the meat. It won’t take long, maybe five minutes, to partially brown the meat.

Pork and beans in the wokIf you’ve chosen fresh beans, now’s the time to toss those beauties in. Stir them frequently for about 3 minutes.

The liquid that’s created from the beans and meat is now perfect for mixing the chicken stock concentrate into. I use a liquid concentrate, and it mixes right in. If you prefer to use dry stock, I suggest you crush it and add a splash of water to dissolve it first.

Allow the mixture to reduce slightly for about 3-5 minutes, and check that your beans are soft enough for the kids. Total time from turning on the wok shouldn’t exceed 15 minutes.

The rice should be ready now (either method usually takes about 20 minutes) so give it a little fluff.

Serve your pork and green beans over rice and enjoy! I love adding sweet chilli sauce (or just chilli flake if I’m watching my sugar) to this dish to add a bit of fire.

Go on, give your Chinese Five Spice an adventure outside of the cupboard, try cooking with Oyster sauce if you haven’t, and for sure add the Sweet Chilli sauce if you want to liven it up. The Hoisin sauce adds a sweetness kids love, and the addition of peas and five spice to the rice makes the whole meal feel exotic and special.

Best of all, it’s delicious and healthy!

Kids portions of minced pork and green bean stir-fry

Sparkly Mummy