Midweek Moussaka recipe

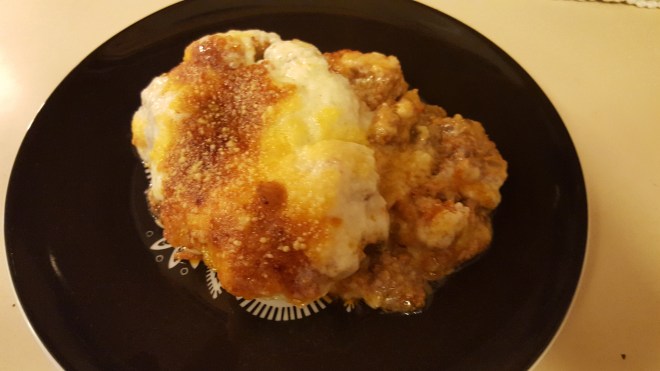
Autumn is a great time to try harvest foods like aubergine and make casserole bakes that warm the house. Greek food is something I rarely make at home, preferring to indulge at a restaurant or friend’s home, but this moussaka recipe is hard to resist. Moussaka is a bit like Greek lasagne: usually layered, meaty and loaded with cheese. The béchamel sauce may be daunting, but I’ve made this recipe a mid-week version that will hopefully calm your aversion. Something magical happens in the oven when the sauce thickens and browns across the top – it’s absolutely worth a try.

My family enjoy this dinner so much. I don’t think there’s anything better than sweet and savoury to get kids interested. The meat is browned with cinnamon and balsamic vinegar, and the béchamel is creamy with milk and parmesan cheese. The aubergine, or eggplant, is lightly fried in olive oil, but I use cubes rather than taking the time to thinly slice for layering. The final product is worth every ounce of effort, and I guarantee this moussaka recipe takes less than most. Even if you think you don’t like aubergine, I think you’ll be surprised at how flavourful, hearty and delicate this dish really is.

Midweek Moussaka Recipe

You’ll need:

  • 2-3 aubergines/eggplants peeled and cubed
  • 2-4 TB olive oil
  • 1 lb minced beef (the leaner the better so you don’t have to drain)
  • 1 cup chopped white onion
  • ½ tsp cinnamon
  • ½ tsp nutmeg
  • 1 tsp garlic granules
  • 1 tsp dried oregano
  • 1 tsp dried parsley
  • 1 tsp salt
  • 1 tsp black pepper
  • 1 8oz tin of tomato sauce
  • ¼ cup balsamic vinegar
  • 4 cups warm milk
  • ½ cup salted butter
  • 6 TB all-purpose flour (not self-rising)
  • 1 egg beaten
  • 1-2 cups grated parmesan cheese

The method:

To begin, peel the aubergines and cube them into 3 cm/1 inch cubes. Some say you should salt the aubergine to absorb water … I usually can’t be bothered, but give it a try if your eggplant seems particularly wet.

cooking-the-aubergines

In a large pan, warm a tablespoon or two of olive oil before adding about half of the aubergine cubes. Be sure to leave space between pieces and fry off in two or three batches. Allow the slightly golden-edged aubergine to rest on kitchen roll while you finish batches and the meat.

Once you’ve spent ten minutes or so lightly frying the cubes, you can reuse the pan for the beef.

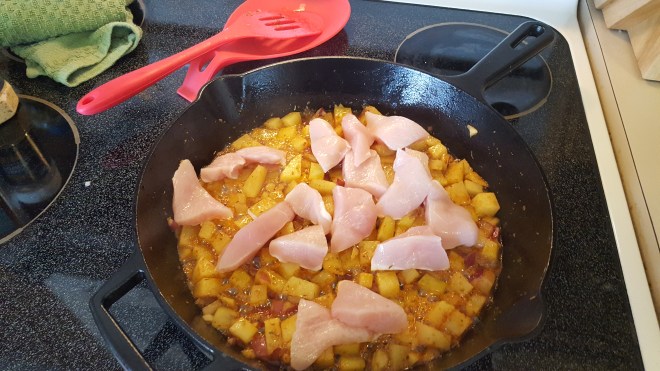
Add the chopped onion, minced beef and dry spices to the pan with what remains of the oil and any aubergine bits.

Cooking mince for moussaka.jpg

Allow the meat to brown nicely before adding the tomato sauce and balsamic vinegar. Bring to the boil before reducing the heat to a simmer for about 15 minutes. Now is a good time to preheat the oven to 180C/350F.

While the meat simmers and reduces, it’s time for the béchamel sauce.

I begin with using a microwave-safe measuring cup or bowl to warm the milk. Microwaving 3-5 minutes on high should do the trick, but you want to be sure the milk is nearly boiling.

In a non-stick pan, melt the butter and add the flour. I use gluten free, and may use a bit less than stated above, but the roux you create will be thick. Mix well with a rubber spatula until smooth.

Gradually add the hot milk, stirring quickly to smooth into the roux. This sounds intimidating, but it’s really going to come through for you.

Once the milk is fully incorporated into the butter and flour, allow it to lightly boil over a low heat and thicken slightly. Remove from the heat and mix in ½ cup of the parmesan.

Cooking bechamel and tomato sauce for moussaka.jpg

Now for the assembly: pour the partially-fried aubergine cubes into the bottom of a large baking dish. Sprinkle about ½ cup of the parmesan cheese over the top of the cubes.

Moussaka ready to bake.jpgPour the meat mixture over the aubergine and add another layer of parmesan sprinkle before pouring the beaten egg over the top.

Pour the slightly cooled béchamel sauce over the top and give it a little wiggle to settle the casserole before popping it in the oven.

Bake at 180C/350F for 45 minutes to an hour, or until the top is golden and solid. Allow the dish to cool before serving to preserve the layers, or dish up straight away if you’re not fussed about presentation.

Enjoy!

plated-moussaka

Sparkly Mummy

Easy gluten-free macaroni & cheese recipe

My kids were born in Surrey, and they never learned about Kraft macaroni and cheese. I know there are a lot of families out there that rely heavily on the cupboard staple that is pasta and powdered cheese mix, and I’m not judging. But between a gluten-free husband and processed-food hating children, I’ve found myself making mac-n-cheese from scratch many times. I used to think cheese sauces were terrifying, but this method skips making a roux with butter and flour, and is nearly fail proof.

The whole dish is really quite easy, and can even be a one-pot wonder if you can wait for the pasta to finish and reuse the pot. I go all out (thank goodness for dishwashers) and use one for the pasta, one for the sauce and a baking dish to finish it off. This baking bit is especially nice for partially boiled gluten-free pasta, but is easily skipped if you fully cook standard flour macaroni or shells.

This takes about the same amount of time as the boxed version, I promise, and is a million times tastier. Skip the processed cheese and have a go at making amazing cheese sauce to smother your pasta of choice.

Easy gluten-free macaroni & cheese recipe

You’ll need:

  • 8 or 10oz dry gluten-free pasta shells or macaroni (I used a corn and quinoa mix shell)
  • Approximately 6 cups of water for the pasta
  • 1 cup of chicken or vegetable stock
  • 2-3 cups shredded cheese of choice (mature cheddar is especially nice)
  • 1 tablespoon butter
  • 1 cup single cream (or half-n-half if you’re in the US)
  • 1 heaped TB soured cream or crème fraiche
  • Salt and pepper to taste

The method:

My super speedy method is to begin with getting the water boiling for the pasta in a medium-sized sauce pan. Use the kettle for at least 6 cups of water if you prefer.

In a second small saucepan, bring the chicken or veg stock to a boil. I generally use stock concentrate and kettle water, so about ¼ teaspoon of concentrate to one cup of water.

Add the shredded cheese (I’m super lazy and buy pre-shredded) one handful/cup at a time and stir well into the stock over a medium-low heat. I usually use a non-stick pan and rubber spatula for this job, rather than risk the cheese and cream sticking to the bottom.

Pour in the cream once the stock and cheese are well blended and beginning to reduce, keep stirring.

Once the pasta water has come to a boil, toss the pasta in with a bit of salt and reduce the temperature.

Add the crème fraiche or soured cream to both thicken and temper the flavours of the stock and cheese. Blend well until the mixture is smooth and slightly sluggish to run off the spoon.

Have a taste and add pepper and salt as you please. Also extremely tasty: a light dash of paprika or oregano, if you’re feeling fancy.

The pasta should be cooked by now, so take the sauce off the heat while you drain and rinse the shells or macaroni.

If you were going for the one-pot method, you’d simply rinse the pot and begin on the sauce while the pasta drains, but I do suggest a little sprinkle of oil to keep the pasta from getting too stuck together.

If you’re going all out, drain the pasta whilst it’s al dente and pour it into a baking dish. Again, I go non-stick so I don’t lose any shells to the pan. Finishing the pasta in the sauce makes gluten-free pasta especially tasty, soaking up the flavour.

Pour your creamy gorgeous sauce all over the pasta and give it a good stir to coat every noodle.

You can add the pasta back into the sauce if you’ve been draining for the one-pot method, stir to coat well and add salt and pepper to taste. It’s ready to serve once the pasta is back to temperature. Enjoy!

Bake the pasta with sauce in the oven at 350F/180C for 15-20 minutes, or until you’re too hungry to wait any longer. Feel free to top off the pasta with more shredded cheese if you’re indulgent and like the layer of crisped cheese on top. My son isn’t a fan, so I leave it off.

My kids absolutely gobble this up, and it’s done within 45 minutes with the oven method, 25-20 with stove top only. There’s plenty of protein and calcium, without needing meat, and using gluten-free pasta, we end up with hidden veg! If you like, throw in some frozen peas if you’re doing the oven method, they’ll be cooked and add a bit of sweetness. You can try vegetable pastas too, and different cheeses for more intense flavours … make it your own! I’ve used this cheese sauce over vegetables as well, if you’re not interested in pasta, and it’s lovely. Hope you have fun and enjoy!

Macaroni and cheese ready to serve

Sparkly Mummy

Caramelised Onion and Mushroom Stew with Pumpkin Pie Pudding recipe

Autumn has entered full steam, and with all the blustering leaves and windy rains outside, I like to fill the home with warm smells and full bellies. When I have a hankering for French onion soup, but I know I need to feed the kids, I go for this all in one stew that can be made with what I have on hand. You can easily caramelise the onions and mushrooms and then use them as a burger topper, base for a bolognese, marinade for chicken or just a chutney for sandwiches. Yesterday, I wanted to add some rump steak and baby potatoes I had on hand, rather than just adding beef stock to the sweet onions and mushrooms to make soup. The result was a sweet, savoury blend of creamy, tender potatoes and beef.

This is a one pot version that can be done with cubed chicken breast and broccoli with chicken stock in place of the beef, potato and beef stock for this recipe and it’s divine. As I mentioned, the caramelised onions can be used in any number of ways if you want to stop there: allow them to cool and store for up to two weeks in a sealed container in the fridge.

The pumpkin pudding is a crustless version that’s gluten free and baked in ramekins. It’s a five minute mix and into the oven; one of the easiest desserts ever. This time of year, I like to decorate the little pies with dark chocolate chips to make jack-o-lantern faces for the kids.

You’ll need:

  • 2 medium onions (I use one red and onion white)
  • 1 TB vegetable oil of choice
  • 1 TB salted butter
  • 1-2 TB balsamic vinegar
  • 1-2 cups sliced white mushrooms
  • 1 lb cubed beef
  • 10-12 Maris Piper/baby potatoes (I had some leftover from Sunday roast)
  • 1 tsp beef stock concentrate
  • 1 tsp dried oregano
  • 1 tsp dried garlic
  • 1 tsp dried thyme
  • 1-2 cups water
  • 1 cup single cream or half and half
  • Salt and pepper to taste
  • 1 tin 425g pumpkin puree (available from American sections in larger supermarkets, or you can puree your own pumpkin)
  • 1 tin 396g sweetened condensed milk
  • 2 eggs
  • 1 heaped tsp pumpkin pie spice (nutmeg, clove, cinnamon, salt)

The method:

Begin with slicing the onion into long strips and adding them with the oil to a wide pot over a medium heat. The onions will sweat and begin to brown after a few minutes of little stirring. Once they begin to brown slightly, try to stir more often so they don’t fry instead of sweetening.Chopped onion.jpg

After 10 to 15 minutes, you should begin to see them all browning, shrivelling and producing a lovely sweet aroma. You won’t need to add any sugar, these release their own natural sweetness that’s impressive.

Once the onions have produced a nice glaze, add the mushrooms and coat them with it. Add in the balsamic vinegar and tab of butter. Keep stirring until the mushrooms and onions are well blended.  onions-and-mushooms-cooking-down

The mushrooms stay nice and firm with this treatment, and make an excellent base for bolognese, marinade for creamy chicken, so a lovely burger topper if you stop here. I don’t blame you if the smells drive you to using this right now.

To finish the stew, add cubed beef and coat with the onion and mushroom mixture before allowing to sit and lightly brown. Depending on the quality of beef, I may reduce the temperature significantly at this point and add more water with the beef stock to tenderise.onion-mushroom-stew-ingredients-raw

Before the meat cooks through, add the beef stock, warm water to cover the meat and dry spices.

Next, add the potatoes to the watery pot. I used already cooked Maris Pipers I had on hand, but you can use raw potato if you quarter them and they cook quickly.  If you don’t want to fuss with chopping, you can add more water to accommodate the time to cook them through, no problem.  Allow the cooked potatoes to boil for at least fifteen minutes to warm through.

Allow the water to reduce by half, exposing the beef and potatoes, before adding the cream. Reduce the heat to avoid scorching, but allow the stew to bubble a bit before giving it a taste. Add salt and pepper to taste.

This shouldn’t take more than an hour from start to finish, with a prolonged simmer in the middle. I love meals that allow me to run after toddlers, maybe even get their bath in while it’s bubbling.  This was served with a dollop of soured cream, my daughter’s favourite.

finished-onion-mushroom-stew

For the pumpkin pudding, preheat the oven to 350F/180C and pull out a medium sized mixing bowl.

Add the pumpkin puree, condensed milk, eggs and dry spice, and whisk together until smooth. I usually use a rubber spatula or fork, but you can use a hand mixer for about a minute if you prefer.

Ladle or spoon the mixture into 6-8 ramekins, about ¾ full. No preparation/grease required.

Bake the pumpkin custard for 20-25 minutes, or until it begins to come away from the edges.

Remove the ramekins from the oven and allow to cool. If you’d like to decorate, use a handful of chocolate chips to fashion a jack-o-lantern while they’re still slightly warm. You can even let the kids help with this super easy dessert!

Pumpkin puddings vertical.jpg

Sparkly Mummy

Warming Beef Stroganoff Stew recipe

This is a recipe that I love to make if I’m craving soft, tender beef and a warm bowl of dinner. I like one pot, one utensil meals. Am I lazy? You bet.

My family are homebodies. I love an afternoon indoors with the children playing and a pot of stew stewing. I found some lovely beef steaks the other day on sale in my local grocery. I had thought of surprising my husband with a grilled steak dinner, but a rain and wind storm threw that plan right out of the window. Instead, I decided to stew up the beef with potatoes, carrots, peas and mushrooms. It’s the kind of stew that can be done midweek; if you only have an hour before dinner and can manage fifteen minutes to get it started, you’ll easily be able to walk away from it until you plate up.

If you’re not a fan of soured cream or crème fraiche to stroganoff the stew, you’ll still have a hearty, flavourful soup, but I think the creaminess and light tang accompany the potatoes perfectly. Traditionally, you’ll find pasta in a stroganoff recipe, but this is my one-pot, gluten-free, family-friendly version.

Warming beef stroganoff stew recipe

You’ll need:

  • 1-1.5lb beef steak (approximately two medium-sized steaks) cubed
  • 1 tsp veg or olive oil
  • 1 tsp garlic granules or fresh crushed garlic
  • 1 tsp dried oregano
  • 1 tsp dried thyme
  • 1 tsp beef stock concentrate
  • 1 cup chopped onion (I use frozen)
  • 1 cup chopped/julienned carrot (approximately one medium carrot)
  • 1 cup chopped mushrooms of choice (I finely chop so they disappear and the kids don’t know)
  • 1 cup petit peas (I use frozen)
  • 15-20 baby potatoes (small Maris Pipers)
  • 4 cups of water
  • ½ cup (or more to taste) soured cream or crème fraiche
  • Salt and pepper to taste

The method:

Using a nice deep pot over a medium-high heat, add the cubed beef, oil and dry spices. Coat the beef with the spices with a quick toss in the pot, and then allow the beef to brown deeply on at least two sides. If the bottom of the pot starts to stick a bit, don’t worry, that’s flavour that will come up with the water.

Once the beef is browned, but not cooked through, add the beef stock concentrate and a splash of water to dissolve. I do this right in the pot and add just enough water to allow me to loosen the concentrate.

Add the onion, carrots and mushroom to the beef and stock mixture and allow the onions to just go translucent; you don’t want the beef to cook completely.

Add the potatoes and peas, then cover with water.  Bring the water to the boil and then reduce the heat to medium-low, just enough to maintain a simmer. You can walk away from this for up to 45 minutes, checking occasionally to be sure it’s not sticking to the bottom or needs a top-up of water. I don’t bother peeling my potatoes, and only halve the largest, so I like to give this a while to bubble. If you are pressed for time, you can peel and cube the potatoes and halve the cooking time, but be careful they don’t turn to mash.

Slightly less close up of stew.jpg

Once the potatoes are soft and the broth has reduced by about half, add the soured cream/crème fraiche and turn off the heat. I probably use a little more than ½ cup, but my family all love soured cream on potatoes. The beef is so tender by now, it won’t even need a knife. I’ve shown the kids plate version and my warmer bowl of succulent stroganoff stew to tempt you. This is a simple recipe that absolutely oozes flavor, give it a go!

Sparkly Mummy

Shredded coriander (cilantro) chicken recipe

I grew up in California, and I’m pretty sure my first solid food was refried beans. My grandma used to joke that my mother’s first meal outside of the home was at their local Mexican restaurant – a mom & pop kind of place. The owner scooped up my infant mom and sat down with my grandparents, ordered her husband to fetch some refried beans and soft tortilla, and let my mom suck the beans off rolled tortilla while they ate. Home-cooked Southern food is in my Texas-born grandfather’s recipes, and Latin food is a staple I’ve grown up with.

This recipe has been adapted for family life, like so many of mine. I desperately try to balance home-cooked goodness for my family and the desire to let someone else cook. As an essentially lazy cook, I’ve ditched the whole chicken version my family used in days gone by. I go for boneless, skinless breasts and thighs … let the butcher do it! I have made this with a whole chicken, when I was away from home and wanted it ‘just like mom’s’, but I spent so much time scooping out bones and yuck that I got a facial. Using the prepared meat allows you to walk away for ages and never steam your glasses.

You can easily and quickly make this recipe with just one breast (of chicken) if you’re only cooking for two, but I tend to go all out so I have plenty of leftovers. I use this in burritos, nachos, salads, sandwiches – it’s incredibly versatile. If you make a large batch, you can freeze a fair bit for an even easier midweek solution. For this recipe, I gave the kids burritos with a little cheese and soft flour tortillas, I had a taco salad with the meat, cheese and salsa as dressing, and my husband opted for corn tacos. Everyone is happy! Hope you enjoy this as much as we do!

You’ll need:

  • 2 boneless, skinless chicken breasts
  • 2-4 boneless, skinless chicken thighs
  • 1 tsp vegetable oil
  • 1 cup chopped onion (I use frozen)
  • 1 cup chopped red/yellow peppers (I use frozen bell pepper mix with green if tight on time)
  • 1 medium carrot, shredded (about ½ cup if you’re using pre-shredded/julienne)
  • 1 large bunch/2 cups chopped fresh coriander/cilantro (4+ cubes if you’re using frozen)
  • 1 TB minced garlic
  • 1 tsp ground cumin
  • 1 tsp smoked paprika
  • 1 tsp dried oregano
  • ½ tsp chili powder for heat (optional)
  • 1 tsp salt
  • ½ tsp ground black pepper

For serving:

  • Tortillas, taco shells, salad, bread rolls or corn chips – your choice.
  • Shredded cheese to serve with the above as you see fit. I like Red Leicester or Double Gloucester for creaminess.

The method:

I despise chopping onions, so I’m a big fan of frozen chopped onion I can keep on hand. I’ve also found the onion and three pepper blend from the frozen section really useful for this recipe in particular, but if I can’t find it in the shop, I start with chopping the onion, a red pepper and a yellow pepper. The same goes for the carrot … I’m super lazy and buy pre-shredded, but if you’re cool doing it yourself, I recommend the cheese grater for one medium carrot.

Use a nice, big, deep pot for this one, and start with the oil, onion, peppers and garlic over a medium-high heat.

Toss in the dry spices and mix well. Add the chicken pieces and coat with the mixture before allowing it to sit for a minute and add colour.

You’ll only want to cook the chicken for a minute or two on each side, not nearly cooking through, for colour/flavour only. Once the chicken has a little golden brown on a couple of sides, add the shredded carrot and completely cover the chicken with water. The chicken will boil now until it shreds completely, as the water reduces.

While the water comes to a boil, rinse and roughly chop the cilantro/coriander, including the stalks. The more the better, in my opinion, so feel free to add up to 3 cups if you’ve used a lot of chicken. I prefer to take the time with fresh coriander here, because frozen just doesn’t have the same punch.

Add the chopped coriander to the boiling water and reduce the heat to maintain a simmer.Shredded coriander chicken for burritos & more - great Mexican cuising

This is where you can walk away for ages. Occasionally give the mixture a stir to check the chicken is still mostly covered with water. After 30-45 minutes, the chicken should break apart if pressed against the side of the pot with a wooden spoon. Every once in a while, over the course of the next 30 minutes, use your spoon to encourage the chicken into smaller pieces.

If you’re rushed for time, or just keen to help, keep the temperature a bit higher to keep a rolling boil and use two spoons to break up the chicken. If you’re happy to let the water do the work, you can keep a mild boil ‘stirring’ the meat for you for about an hour. Just be sure to check it’s not sticking on the bottom once in a while.

As the water reduces, step in and break up the meat to expose it all to the sauce before it’s gone completely. I usually find a fork isn’t necessary – just good stabbing, twisting and mashing with the wooden spoon (great for letting off a bit of aggression in a legitimate way).

Once the chicken is nicely broken up, allow the remaining water to boil away, stirring frequently at the end to avoid burring. 

The result is an easy filler for lots of different dishes. Straight from the pot, I load up a flour tortilla with a bit of shredded cheese for my kids and roll it up. They’ve been smelling it and can’t wait!

bitten-burrito

Sparkly Mummy

What to do with those roast dinner leftovers?

I love soup, especially in autumn, and I’m always so excited to have steamy bowls of slurpy goodness. My kids, not as keen, and certainly not as clean, on soup. My go-to solution since they were tiny is to serve soup over rice, like in my albondigas recipe.

Add a little, add a lot – it depends on the consistency and flavor your kid enjoys most. If the soup is liquidy, a couple of teaspoon of cooked rice soaks it up. If it’s a cheesy or creamy soup, just a small amount will add texture and thicken, allowing young diners to use their own spoon. We love encouraging our little ones to feed themselves, freeing our hands for food of our own.

This little tip comes in handy for all sorts. I’ve been known to make an enormous roast dinner with too many leftovers (haven’t we all?).

Warming autumn dishes using whatever ingredients you have in

The method:

  • Cube up some gammon/chicken/beef (or forget the meat!)
  • Warm it in a small shallow pan with a splash of water
  • Take some leftover cauliflower cheese, put it in a deep bowl, add some milk and warm it covered in the microwave for a minute or two
  • Give it a good smash up and it basically becomes soup.
  • You can add a bit more milk if you want to loosen it.
  • Once it’s nice and warm, and considerably smashed, add a little rice, the meat, and any spare veg you have from the roast

It’s a bit like bubble and squeak, but with rice instead of potatoes. Enjoy!

Sparkly Mummy

Potatoes ‘Bravas’ with chicken recipe

My husband is Portuguese South-African, and I’ve grown to love paprika in an unusual way. Chorizo is something special; if you’ve never tried cooking with this sausage, I encourage you to try this recipe and discover the joy. I try to find a good quality, hard chorizo, simply because most ‘cooking’ chorizo is incredibly fatty. If you can’t find any, don’t worry, the recipe calls for it optionally for depth of flavour.

potatoes-bravas-pinterest

This is a take on the Spanish patatas bravas: crispy cubed potatoes heavily spiced and fried. I try to keep midweek meals to one pot, and this is a good one if you add chicken strips/chunks to the pan. My kids are big fans of sweetcorn, so I always keep a tin on hand. With this dish, it adds a crunchy sweet freshness that curbs some of the spice. I usually drain the corn, but keep it room temperature and sprinkle on like a sort of veggie crouton.

If I don’t have a lot of time to stand at the stove, this is also a fabulous tray bake for about 40 minutes in a 180C/375F oven. I try not to use too much oil and salt, but you can use your judgement and taste buds for this quick, flavourful meal. It usually only takes twenty minutes to cook, if the potatoes are in small cubes, and it’s something I fall back on if I’m short on ingredients. Most are staples I have on hand, and it takes very little prep.

chopping potatoesYou’ll need:

  • 1 or 2 white potatoes, peeled and cubed
  • 1/3 cup chopped red or white onion
  • 1/3 cup roughly cubed chorizo sausage (optional)
  • 2 tsp veg oil of choice
  • 1 or 2 chicken breasts sliced into strips
  • 1 tsp garlic granules
  • ½ tsp paprika
  • ½ tsp cumin
  • ½ tsp oregano
  • 1 tsp salt (to taste)
  • 2 TB chopped tomato
  • Approximately 1 cup sweet corn

The method:

If you’re lucky enough to have found a lovely chorizo, start with slicing and quartering about a 1/3 of a cup and add it to the warming pan. I use a cast iron pan, but you can also use a wide-based pan that’s good for browning.  I keep the temperature around a medium-high while the chorizo warms and begins to run paprika juices – it smells amazing!

Add the onion and potato to the oil produced and stir until they are coated with the colourful paprika oil from the chorizo. Then add the veg oil and dry spices, coating the potatoes evenly before leaving them to brown.

spices and potatoes in the frying pan

If you aren’t using chorizo, add the oil, potatoes and onions all together with the dry spices and give it a good mix before leaving to fry over a medium high heat.

Stir infrequently to allow colour to form on all sides of the potatoes. If the spices begin to stick to the bottom, rather than adding more oil, try adding a splash of water from the kettle and gently scraping the bottom of the pan with a spatula. This will also help soften the potatoes in the steam produced.

While the potatoes are softening, I slice up the chicken into small, even strips that will cook quickly. If you’re going for the tray bake, try to keep the chicken pieces a little larger so you can put everything in at the same time and they won’t be overdone.

Add the chicken to the potatoes before your next scheduled stir, and toss everything together to coat the chicken with the contents of the pot. Again, refrain from too much stirring so you’re sure to get good colour on most sides of the potato cubes and chicken.

raw chicken added to potatoesAdd the chopped tomato and give it another good mix-in. The chicken should be cooked after 10-15 minutes, and the tomato adds a bit of tenderising acidity.

You should be able to break a piece of chicken apart easily with your spoon, and the same again with a potato cube, after 20-25 minutes.  Drain your sweet corn, or slice from a fresh cob if it’s the right season.

Potatoes bravas in the pan

Plate up with a sprinkle of corn over the bravas, and enjoy! My kids don’t even ask for ketchup with this, because the tomato and spices in the dish keep it moist. The chicken stays tender and flavourful for the quick cooking, and I’m in and out of the kitchen in no time.  If I’m really pressed for time, I toss everything together into an oven tray and check on it for a stir every 15 minutes until it’s done. Either way, it’s a winner, winner chicken dinner in my house!

dinner-plates-with-food

Sparkly Mummy

Recipe for Albondigas (Mexican Soup)

This is a recipe that’s been handed down in my family and adapted for family life. My grandfather, the chef of the house, would take the time to make meatballs, as the standard Albondigas is a meatball soup, but over the years I’ve fallen out of using that method. It is a different experience to have moist meatballs with broth, but this recipe maintains all the flavour without all of the fuss.

This recipe is my version of a traditional family chicken soup: perfect for a cold! It’s also a celebration soup; it’s on the back burner at most family gatherings or parties, ready for anyone to scoop up a bowl with a few corn chips and some guacamole on top. It’s truly a delicious, healthy dish that emits amazing aromas all day.

I serve this soup over rice for my kids, draining a fair bit of broth, but loading meat and veg onto the top. They love guacamole, and the promise of a few corn chips for dipping. My son especially likes shredded cheese on top, and my daughter likes soured cream. My husband and I prefer a nice deep bowl with a handful of corn chips crushed on top, a handful of shredded cheese and dollop of guac. The cheese gets gooey and gorgeous, and the corn chips soften, adding an almost enchilada flavour that’s divine.

This post includes my coveted guacamole recipe as well, so make sure you have a couple of ripe avocados on hand (or more), and a bag of salted corn chips for dipping. You can make this soup as thick or as brothy as you like, and it gets better as it simmers. It freezes well, if you make a big batch, and can be stored for quick dinners another day. If you’re only making this for a grown-up crowd, add plenty of chilli to kick up the heat – it won’t disappoint.

Mexican albondigas soup.jpg

You’ll need:

  • 1 tsp vegetable oil
  • 1-1.5lb ground/minced beef
  • 1 TB minced garlic
  • 1 cup chopped white onion (I use frozen)
  • 1 tsp ground cumin
  • 1 tsp smoked paprika
  • 1 tsp dry oregano
  • ½ tsp (or more) chilli powder or chilli flake (optional)
  • 1 tsp or 1 cube beef stock concentrate
  • 1 cup shredded/grated carrot (about one medium carrot)
  • 1 can chic peas/garbanzo beans drained and rinsed
  • 1 can chopped tomato (optional, but don’t use crushed – you want chunks of tomato)
  • 1-2 cups topped, tailed and halved green beans (I use frozen in a pinch)
  • 1-2 cups chopped coriander/cilantro with stalks (usually one good sized bunch)
  • ½-1 cup chopped red pepper
  • 2 med ripe avocados
  • 1 tablespoon lime juice
  • 1 teaspoon (or more) garlic powder or fresh garlic
  • ½ teaspoon cumin or smoked paprika or both
  • Salt to taste
  • Corn chips, rice or tortillas for dipping (optional)

The method:

This recipe begins, like all great dishes, with garlic, onion and beef mingling in the pot, browning together with a bit of oil. The best method is stirring infrequently, allowing the beef to brown while the onions soften. I’m usually a “full-wack” cook, so I start out on a high heat and break up the beef with a wooden spoon.

After a couple of minutes, there should be a liquid forming from the beef and onion. Add your dry spices and mix into the beef as you continue to break the beef into small pieces for browning. Once it’s pretty well broken up, leave it sit on that high heat to give great colour and flavour. Don’t worry if the spices start to stick a little to the bottom, it’s all flavour that will come off with the addition of water.

Once your dry spices are in and the beef is browned nicely, add the beef stock concentrate and a splash of water, and mix in the beef.

Add drained, rinsed chick peas, shredded carrot, red peppers and tomato. I usually chop as I’m cooking, so the chick peas and tomato are easy to throw in first, then chopped carrots and peppers once they’re finished. If these go in after the water, it’s not going to change the flavour.

Add enough water to thoroughly cover the mixture and bring to a boil. I usually add the water after the chick peas and tomato have had a chance to fry off a bit. If the mixture is getting too dry, reduce the heat or add a splash of water at any time.

Add chopped coriander, reduce heat to med-low and allow to lightly boil for at least twenty minutes. This soup can simmer away for hours, but it’ll be ready in thirty minutes if you keep the lid on. Be sure to save some of the coriander leaf for your guacamole.

This may sound odd, but a dollop of fresh guacamole is delicious with this soup. If you’ve never added a cool topping to stew, you’re missing out. I love guacamole, and keep it pretty simple to let the avocado speak for itself, but some swear by adding a little Greek yogurt or soured cream and salsa to theirs, and it’s still delicious. This is my method, and I only add yogurt or soured cream if the avocado isn’t quite ripe, because it adds creaminess.

Mash 2 medium avocados in a bowl with a fork with lime juice, dry or fresh garlic and cumin and/or smoked paprika. Once the avocado is mostly smooth, add salt and give it a taste. You may find another sprinkle of any of these flavours as needed to taste, but try not to overdo it and mask the avocado. Sparingly add more lime juice, because it can overpower with citrus.

homemade guacamole

I rip up a small handful of coriander leaves left from the soup, avoiding stalks for this fresh side dish, and mix the leaves into the guacamole for a final smashy stir. I like my guac with bits of avocado, but you can smash until it’s completely smooth if you prefer. Best to taste test with a corn chip so you don’t go overboard with the salt.

If you’re feeding a crowd, amp up the quantities and I guarantee the guacamole will be gone by the end of the night. I usually put a tower of bowls, pile of spoons, a bowl of shredded cheese with the chips and guacamole beside the pot of soup at a party and let folks serve themselves. My kids will happily eat the soup over rice (drain the broth a bit), and my son likes smashing the chick peas in his bowl. It’s another fabulous, veggie-packed meal they scoff without hesitation. And if you’re sick of chicken soup, give this one a go … it’s sure to clear your head!

Mummy in a Tutu

Chinese take-away pork & green beans recipe

We’re all so temped by take-away food – the ease, convenience and speed, and the taste! Over the years, I’ve lived with people from a lot of different cultural backgrounds. East Asians, Pakistani, Greek, Italian and English tastes have now fused with my own and had a major impact on my cooking.

Anyone that’s been following this recipe blog will remember the Tandoori Chicken and Dahl recipe I shared, fine-tuned with tips from a Pakistani friend of mine. The dish I’m sharing in this post was learned from my wonderful Chinese housemate – and like most of mine, it’s one that you can make your own in no time. The recipe I’m sharing here is one variation, and it can easily incorporate more or different veg, Quorn or ground turkey.

This is a super-fast, kid-friendly meal that’s also gluten free. It can be vegetarian if you prefer to stir-fry tofu or Quorn. My hubby always goes for seconds on this one, and there’s just so much less oil, MSG and other restaurant add-ins. Trust me: try this and you won’t even miss the local Chinese.

You’ll need:

  • 1lb ground pork
  • 1 tsp sesame oil
  • 1-2 tsp Chinese five spice (or your own with clove, anise and black pepper at least)
  • 2 cups topped and tailed green beans (fresh is quicker, but frozen is fine)
  • 1-2 tablespoons Oyster sauce
  • 1-2 tablespoons Hoisin sauce (we use gluten free)
  • 1 tsp rice wine vinegar
  • 1 tsp or one cube concentrated chicken stock
  • 1 tsp onion powder
  • Optional sweet chilli sauce (for grown-ups and adventurous kids)
  • 1-2 cups white rice (gauge your family’s love of rice)
  • Chicken or veg stock in the rice (optional)
  • 1 tsp of Chinese five spice in the rice (optional)
  • 1 cup frozen peas in the rice (optional)

Chinese stir fry ingredients

The method:

If you’re lucky enough to own a rice cooker, by all means use it, and well done you. I am a sad sap and have no such luxury, so with this recipe I get the rice started first, in a pot, on the stove. I add a bit of chicken (or veg) stock, a dash of Chinese Five Spice and some frozen peas to the water, bring it to the boil and add the rice. Some rice cookers are cool with spices and stock, but if you’re not sure, maybe just make plain white rice, and the stir fry will still be amazing.

Mix the Oyster and Hoisin sauce with the five spice and onion powder and set aside.

If you’re using frozen green beans (they’re already topped/tailed/halved!), I recommend starting with the beans in the wok with the sesame oil. Toss the beans around to lightly coat with the oil, and then turn the heat to high. If the beans are fresh, add them after the meat has begun to brown.

Rice and stir fry on the stove
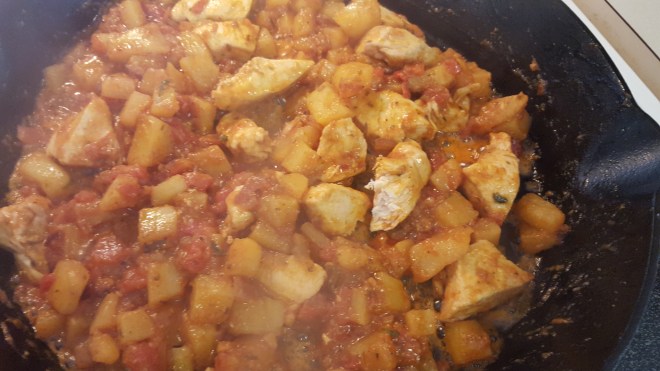
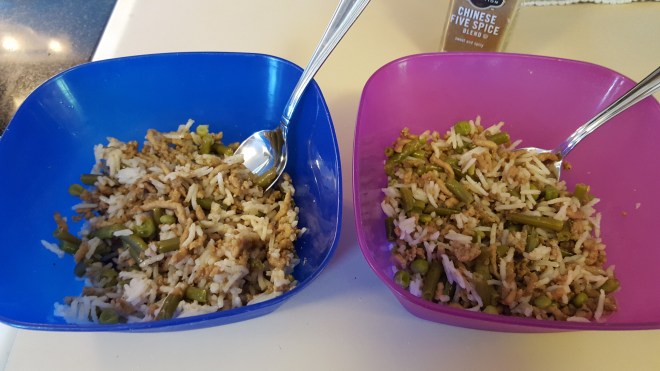
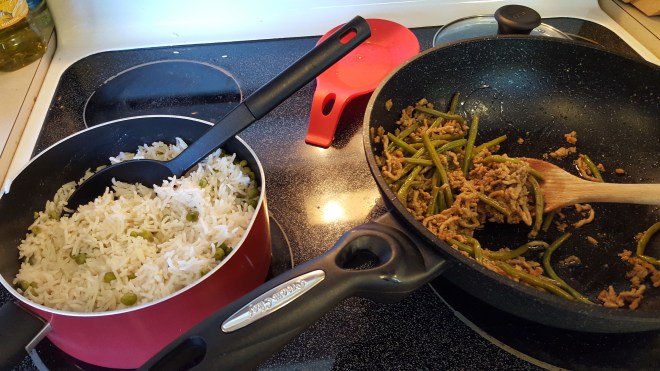
On a high heat, keep the beans from sitting in one spot for too long while they thaw a bit. Once they’ve started to soften, they should only take 2-3 minutes.

Add the ground pork and break it up in the wok. Be sure the sesame oil is in the wok if you’ve not added the beans yet.

Add your pre-mixed sauces and spices (Oyster, Hoisin, five spice and onion powder). Mix it into the meat as you’re breaking up the mince. The benefit of pre-mixing the sauces and dry spice is these can all be added in one swift motion, allowing you to continue stirring and breaking up the meat.

Once the mince is broken into nice small bits and all coated with the sauce, stop stirring for about a minute or two (phew!) to allow some colour to brown onto the meat. It won’t take long, maybe five minutes, to partially brown the meat.

Pork and beans in the wokIf you’ve chosen fresh beans, now’s the time to toss those beauties in. Stir them frequently for about 3 minutes.

The liquid that’s created from the beans and meat is now perfect for mixing the chicken stock concentrate into. I use a liquid concentrate, and it mixes right in. If you prefer to use dry stock, I suggest you crush it and add a splash of water to dissolve it first.

Allow the mixture to reduce slightly for about 3-5 minutes, and check that your beans are soft enough for the kids. Total time from turning on the wok shouldn’t exceed 15 minutes.

The rice should be ready now (either method usually takes about 20 minutes) so give it a little fluff.

Serve your pork and green beans over rice and enjoy! I love adding sweet chilli sauce (or just chilli flake if I’m watching my sugar) to this dish to add a bit of fire.

Go on, give your Chinese Five Spice an adventure outside of the cupboard, try cooking with Oyster sauce if you haven’t, and for sure add the Sweet Chilli sauce if you want to liven it up. The Hoisin sauce adds a sweetness kids love, and the addition of peas and five spice to the rice makes the whole meal feel exotic and special.

Best of all, it’s delicious and healthy!

Kids portions of minced pork and green bean stir-fry

Sparkly Mummy

Low-cal chicken salad made in minutes

As I mentioned briefly in my post about losing the baby weight, I’m a devotee of the 5:2 or “Fast” diet. This means that 2 days a week, I only eat 500 calories all day (and then eat normally the rest of the week). I usually skip breakfast, then have a 200-cal lunch and a 300-cal dinner. You’d be surprised at how much food you can have for 300 calories!

My usually recipe guest poster, The Mum Recipes, is having a break this week. I wanted to share this super easy recipe I made the other day. I’m not normally the type to make up recipes, so I’m pretty proud of this!

The other night I wanted a quick, tasty, 300-calorie dinner for just me. I wanted to use leftovers from the roast chicken dinner we had the night before, and other random stuff I had lying around. I also wanted something with an exotic flavour. Here’s what I came up with…

You’ll need:

  • 1 skinless chicken breast. I used a leftover one from the roast chicken we had the night before. You could also use store-bought chicken pieces. If you want to cook it yourself, simmer in chicken stock from a stock cube for 8 minutes (make sure internal temp at least 70C), and then leave to rest while you assemble the rest of the salad.
  • a large handful of broccoli or other leftover green veg. I used broccoli from my roast dinner leftovers. You could use any green veg you have lying around, or just good old-fashioned lettuce.
  • 5 cherry tomatoes or half a normal tomato (if you’re watching calories, don’t overdo the tomatoes as they have a lot of natural sugar).
  • 1 spring onion or a sprinkling of normal onion (surprisingly, onions are high calorie – for veg – as well!)
  • About 2 inches of cucumber (get your mind out of the gutter)
  • 1 tsp fish sauce
  • 2 TB lime juice (from a jar is good)
  • 1 tsp toasted sesame oil
  • A sprinkling of chilli sauce if you fancy it. My fave is Cholula, but Tabasco or any other would do.

The method:

Use your hands to pull the chicken breast into thin strips, then throw it in your salad bowl.

Add your green veg. It’s best to have smallish bite-sized pieces so you don’t have to make much effort once you’re eating. You can also use your hands to pull your broccoli into smaller bitesize pieces. Other green veg could be chopped.

Halve the cherry tomatoes (or dice your larger tomato) and throw that in. Dice up the spring onion – chuck it in. Dice your cucumber. I like to slice the rounds and then cut those into four to make little triangles.

In a little bowl, vigorously stir together your fish sauce, lime juice and sesame oil. Then pour it over your salad and toss it up.

Sprinkle your chilli sauce on top if you’re into that sort of thing. You can also add salt & pepper, but fish sauce is already salty, so taste it first.

Credit: The salad dressing is a simplified adaptation from the ‘Szechuan Chicken’ recipe in The Fast Diet Recipe book.

Mummy in a Tutu
Design a site like this with WordPress.com
Get started